Protocol for handling pressurized gas cylinders
Introduction
The following protocol describes how to order, safely transport, and handle pressurised gas cylinders.
Safety info
Read posters explaining how to use the gas regulators in the gas room.
EquipmentCylinder trolley, adjustable wrench, gloves, safety shoes, leak test detector.
Pressurized gas cylinders pose certain risks and they must be handled with care. Gas cylinders are heavy because they are made of metal and must withstand a high pressure. Their long and narrow shape means that they are unstable when standing and can easily tip over if they are not secured. Gas cylinders should therefore always be strapped or chained to a dedicated holder regardless of whether they are empty or full and always have the metal hood attached when they are transported and not in use. Always use a cylinder trolley when transporting gas cylinder.Only inert gasses and O2 should be stored/used in the gas room. Flammable gasses and toxic gasses should be stored in dedicated storage cabinets with a separate ventilation system.
Gas cylinder tipping handlingGas cylinder dropping or tipping over can cause weaknesses or cracks in the cylinder’s shell, which can give rise to a gas leak or result in explosion. Try to handle cylinder with care and avoid dropping or hitting them against anything. A damaged gas cylinder is not safe to use and must be returned.
Remember to fill in and attach the declaration form when accidents happen.
Ordering gas cylinders
Gas bottles are ordered through the ordering system in BasWare PM by Anna Tran (Hildegunn Almelid, Lars Evje or Eivind Støren). An order needs to be made before 12 AM to receive a delivery (earliest) the day after. Ordered gas bottles are placed in the gas room in the basement, room KH8a, with a sign “Geovitenskap” and order confirmation to know who they belong to. The key to room KH8a in the basement is available in TE15b on 5th floor or ask Pål Tore/Lars Evje.
Gas cylinders should immediately be moved to the gas room at the 5th floor (TE15b) and empty ones should be taken down to room KH8a to be returned. Remember to place a yellow sign around the bottle neck for returning cylinders from the Earth Science Department.
Transport of gas cylinders
Currently we are taking the lift with a cylinder trolley as this is considered to reduce the risk of a cylinder tipping over and the risk of a leak is small. Since the gas cylinders are more heavy than they look like it might be useful with good pair of shoes. Everyone should have training before transporting or using gas cylinders.
Changing gas cylinders on gas lines
There are posters explaining how to use the gas regulators in the gas room, which should be followed. The following points are worth noticing regarding changing cylinders on gas lines.
Disconnecting an empty gas cylinders
Gas cylinders should be replaced when the pressure gauges displayed shows approximate 5-6 Bar remaining. When the pressure falls to low the panel automatically switch to the alternative side.
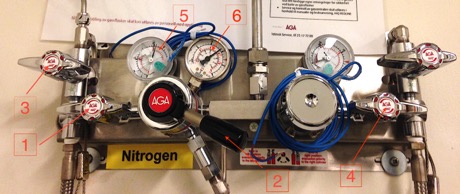
- Make sure the purge valve (valve 3) and valve to the pressure regulator and the gas line are closed (valve 1 for changing the gas bottle on the left side/valve 4 for changing the gas bottle on the right side), no air should enter (Figure 1). The valve is close when it is perpendicular to the gas line and open when it is parallel to the gas line.
- Close the bottle valve by hand and switch the gas cylinder priority valve (2) if the gas line is connected to another cylinder containing the same gas.
- Relieve pressure in the gas panel by opening and close valve 3.
- Take the empty bottle off the regulator with an adjustable wrench, cap it with a metal hood, move and fasten it with a bottle trolley.
- Secured the empty bottle with a chain or strap.
Connecting a new gas cylinder
- Check if the new gas cylinder contains the correct type of gas.
- Chain the new cylinder before taking off the cap/metal hood
- Secure the hose by pulling the metal loop over the gas cylinder valve.
- Connect the regulator to the high-pressure hose. Use a wrench to tighten the hose and control that the hose is not twisted or in tension. NB! Make sure the seal is in place before connecting. If it´s broken replace it with a new one.
- Open and close the gas bottle valve briefly to pressurize the connection tube (about 3 sec).
- Open and close the purge valve at the regulator to empty the connection tube.
- Repeat point 10 and 11 at least three-five times to remove air and fill the connection tube with gas from the bottle.
- Leave the bottle valve open and the purge valve closed the last time.
- Open the valve to the pressure regulator and the gas line. The incoming gas cylinder filling pressure the can be read on the display on the pressure gauges (5) for changing gas bottle on the left hand side. While the outlet pressure can be read on the display on the pressure gauges (6). They are with a bar/psi double scale.
- After a gas bottle is connected, leak test should be performed. This can be done with a leak detector (not N2 and O2) or with soap water in the connection. The pressure of the gas system should also be monitored in the following hours to verify that there are no large leaks. All users of the gas system should monitor the remaining pressure of the gasses they use. The costs of running out of gas can be high.

Written by Anna Tran 04.09.2019
