Protocol for freshwater and saltwater stable isotope analysis on Picarro
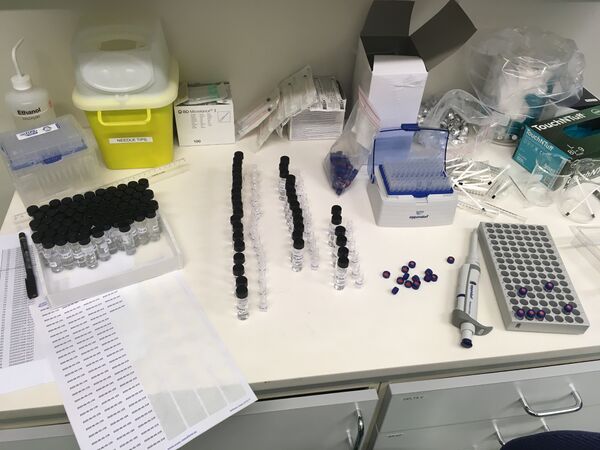
Figure 1: Typical layout of workspace during the preparation of a run with sample list, labels, sample vials, GC vials, pipette tips, pipette, sample tray, and waste area (from left to right).
Project preparations
The entire workflow during analysis of a set of samples is shown as a workflow diagram in Fig. 2. Each step is detailed further below.
Figure 2: Summary of workflow during liquid sample analysis
- Customer contacts FARLAB member with a price inquiry, measurement capability.
- The customer fills out the registration form to provide contact and sample information.
- For water isotope analyses, HS or PTM approve the analysis request,
- Register project in FARLAB database (http://echo.geo.uib.no:8085),
- Prefill and rename sample list (File:water_isotopes_sample_list_template.xlsx.zip) and send it to the customer.
Sample handling
- Receive completed sample list and samples from customer
- Label samples with name of customer and FARLAB project ID, and place in fridge
- Include FARLAB IDs in sample list and check provided information
- Print out sample list.
- Print labels for small vials using Excel form: File:Mal merkelapper_xxxx-xx-HS.xlsx.zip
Preparing runs/batches
- Prepare sample containers and corresponding labelled 1.5 mL GC vials (see Fig. 1) such that chances for mix-up are minimised
- When samples do not need to be filtered, use 1000 uL pipette to transfer 1ml of water to the GC vial. Change pipette after each sample. For clean samples (snow) it can be acceptable to reuse tips after complete drying. Vials should be filled at max below neck level. Tighten vial caps only slightly to prevent damage of the septum.
- When filtering of samples is required (groundwater, runoff, visible contaminations), use a syringe to pull liquid, place single-use Nylon filter on syringe tip, and transfer water to vial through the filter. Discard filter after use.
- The typical number of samples in a batch is between 20 and up to 40.
- Include two calibration standards and one drift standard in each run. One vial of the drift will be with the calibration standards, and an additional one for every 7-9 samples included in the run.
- Prepare standards from bottles in FARLAB fridge with 0.5 to 1.0 mL of standard. The range of standards depends on the samples. A too close proximity of the standards will give more uncertainty during calibration. The drift standard should be either DI2 (precipitation, runoff) or BERM (sea water analysis). Turn shake glass bottles with standards lightly to mix in any condensate on the bottle walls before pipetting. After each use, consider to refill bottles to marking from standard water tanks in the gas room, using the nozzle on each tank.
- After vials have warmed to room temperature (15 min), briefly open the cap to allow for pressure equilibration in the vial. This prevents humidity variations during injections.
Running analysis for a batch
Create sample_description_<FARLAB_ID>_sample_description_runxx.csv
The sample description is a simple text file in csv format with columns indicated below, and using comma for separation. It is most convenient to create such files with OpenOffice and to export as csv. The first indicator is the name of the sample provided by the customer, indicator2 is the FARLAB ID. In case of standards, the name is the name of the lab standard, and the indicator is composed of standard_<date of filling vial>. This allows to control the reuse of vials. Example:
tray, vial, indicator1, indicator2
1,1, GLW, standard_20200201
1,2, DI2, standard_20200201
1,3, EVAP2, standard_20200201
1,4, RTG_01, 2020-01-HS-001
1,5, RTG_02, 2020-01-HS-002
The sample description is loaded with the coordinator button "load sample description" at any time during the run (see below).
Log run details in instrument logfile (Picarro-L2140i-HKDS2038/9.txt) using Notepad++
Each analyzer has an electronic log file that is placed in the directory C:\IsotopeData. The name of the file starts with the instrument type, serial number and ends in "log", for example Picarro-L2140i-HKDS2039-log.txt
Every new log entry starts with information of date (YYYY-MM-DD) and a two-letter identifier of the author in brackets, followed by the time of the entry in UTC time. When several significant entries are made on the same day with a time gap in-between, only the time needs to be stated. For example:
2019-02-01 (HS)
12:00 UTC
Upon preparation and starting of a run, the following details are noted:
- Short description of samples, FARLAB project
- Job method (FARLAB_freshwater/saltwater with sample volume, rinses)
- Mode (High prec double wet peak, 17O, High throughput,...)
- Number of samples
- Sample description file name
- Coordinator file name
- Sequence of samples. This is a summary listing the sequence of samples and standards in which they are sampled. This sequence can be complete, but can also be limited to providing information on the number of injections for standards, and a bulk sequence (e.g. 10 injection for vial 4 - 20, 16 injections for vial 3,2,1)
Upon completion of the run, the result (success/failure) and possible comments should be noted. Comments include change of septum, cleaning and change of syringe, and other relevant notes. Example:
31.08.2018 (HS)
running samples for 2818-21 Poo the Bear
Job method:  FARLAB_freshwater_1dot80 (sample volume 1.8 uL, 3 pre rinse only between vials, 1 fill stroke)
Mode: High Prec double wet peak
Filename: HKDS2038_IsoWater_20180831_095233.csv
Number of samples: 20 vials
Sample description file: PTM/2018_21_Poo_180828_21-40.csv
Filename: HKDS2039_IsoWater_20180621_112436.csv
Sequence:
DI(23.05.18),SEAII,EVAP ,Sea old(11.09.17),
2018-21-001,002,003,004,005
Sea old
006,007,008,009,010
Sea old
011,012,013,014.015
Sea old
016,017,018,019,020
DI,SEAII,EVAP,Sea old
Run a batch on HKDS2038/HKDS2039
- Place GC sample vials with injecta port septa caps in the same order as in the sample description file at the Picarro tray. The standard must be run one after another at the beginning of each batch to enable FLIIMP to correct for the drift of the known standard.
- Manually clean, or exchange a new syringe before analyzing a new batch. Syringes are expensive and they should only be discarded when they stop working despite cleaning. For cleaning the syringe, follow these steps:
- If autosampler is running, go to the autosampler window and press "Change syringe."
- If not, start the "Autosample training" software, press "Training", and then "Exchange syringe". The advantage of this method is that the zero position of the plunger can be adjusted after inserting the syringe.
- Clean the syringe first with distilled water (20 injections), acetone (20 injections), ethanol (20 injections) and at last distilled water again. Be careful NOT to pull out the plunger aggressively of the syringe. This can cause the plunger to crumple. At the end spin the plunger with your fingers. After that, the plunger should move smoothly through the barrel.
- Carefully re-insert the syringe into the autosampler by manually depress the metal block holding the syringe. Then click on “swap on” if you have pressed the change syringe button.
- Replace the port septum after each 300-500 injections. A leaky septum will lead to degradation of the stable part of the injection (marked in red in the analyzer software) since it becomes difficult to maintain the vacuum inside the vaporizer. On the saltwater Picarro, salt may accumulates below the port septum and can be removed manually (see below). For exchanging the septum, follow these steps:
- If autosampler is running, go to the Coordinator window and press "Change septum". This will pause the Autosampler and the vaporizer in the middle of the analysis at the next possible opportunity.
- Otherwise, remove the protective metal cover around the injection port by hand or with the tool around it. Do not use a wrench to unscrew the port. WARNING! THE BOTTOM OF THE CAP IS VERY HOT.
- Take out the septum that usually sticks to the port with a tweezers. Insert the new septum (blue one) into the cap and screw the cap back onto the port by hand until it comes to a hard stop. CAUTION! DO NOT OVER-TIGHTEN AND DO NOT USE A WRENCH.
- Replace the metal cover around the injection port. If you used the change septum button, click the “Septum Changed” button to restart the analyzer.
- Close the Coordinator launcher window before opening it again by double-click the icon labeled “Coordinator launcher” at the desktop. Choose the coordinator (High precision double wet peak) and then press launch. Wait until the lower part of the window signalize that the vaporizer is cleaned. Once launched, the coordinator will automatically start collecting data. The data will be available in the graphical user interface (GUI) as pulses in the CRDS data viewer window.
- Return to Autosampler window, setup and then start the run by pressing button "Start". Control the boxes in "job queue" or set parameters for your analysis. The first four injections of each vial are used for memory removal with the wet flush method. The three standards at the beginning are run with 16 injections, and all remaining samples are run with 10 injections. In the Coordinator, this will result in 12 visible injections for the standards, and 6 visible injections for each sample. To enable memory correction from the standard vials, at the start of each run there must be 5-6 injections from a different standard (typically the one in vial #3) to prime the vapourizer with some memory. The number of injections is set using the Autosampler controller. Each injection cycle takes about 9 min. An example for the Autosampler setting is thus:
- Test injection peaks 3x and adjust syringe volume
- Return to Coordinator window to load the sample description file by clicking on “load sample descriptions”. It is allowed to load the sample description files at any time during the data collection.
- In the Coordinator window, one can monitor the results from the sample analysis, see the current status of your analyzer and load sample descriptions. In the upper portion of the window each row represents the analysis results from a single injection. The lower portion of the window displays the action that is currently taking place.
- Monitor run from Remote Desktop/lab
- Check for humidity variations outside 15’000-25’000 ppmv
Finalizing the analysis after each and after all runs
- Recap/store or discard sample vials
- Update sample list
- Calibrate runs with FLIIMP
- Upload sample results to FARLAB database
- Repack and return/archive/discard samples
Choosing the range of standards
Depending on the known or expected range of the samples, the calibration standards need to be chosen. The calibration standards should bracket the range of samples as close as possible. If the samples are processed in several batches from different sources (groundwater/snow/rain), the calibration standards may be adjusted for each run. Typical combinations are:
- EVAP/VATS for mid-latitude precipitation samples
- DI/GSM1 or DI/VATS for snow
- EVAP/VATS for lake or stream water
DI2 or SEAII should always be included as the long-term drift standard of the laboratory. The sequence of the standards should be such that the jump to the first sample is minimised. For example, when measuring snow samples, the sequence would be EVAP2-DI2-GLW-Sample1 etc.
Memory from samples and standards
Memory is a challenge for all liquid measurements. Standards are measured with 12 injections, with 2 preceeding double-peak wet flushes, requiring in total 16 injections. Samples in contrast are commonly run with 6 effective injections, i.e. 10 injections with a double-peak wet flush. The isotope composition between the samples of one run typically varies less than the jump from the last standard and the first sample. Therefore, sample 1 is duplicated in the run, and discarded in the analysis.
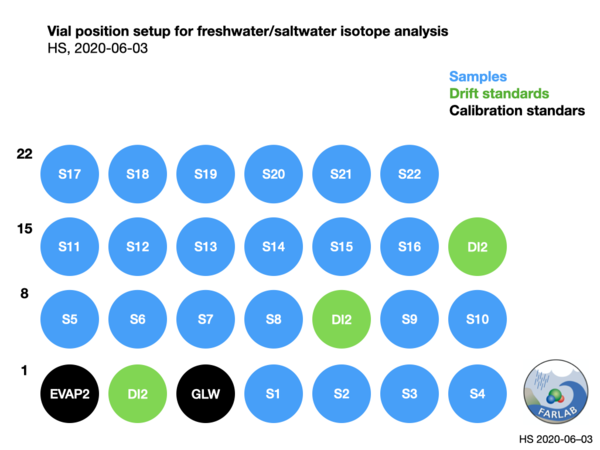
The drift standard is introduced after 10 samples in the run sequence, and measured as if it were a sample. Memory correction routines in FLIIMP will minimize memory from previous injections, and thus no duplication of sample vials is required. The resulting setup of the run is shown in Fig. 3.
Figure 3: Vial setup for a typical freshwater run.


